
Development environment
See all requirements details here
Create a local project
Build the application
You can run build.sh script to run all the commands to compile front-end, back-end and pack everything in a deployable package.
./build.sh [version_identifier]
version_identifier is an optional identifier of the generated war that will be shown in the settings panel of the application.
You can deploy the generated mapstore.war file (in web/target) to your favorite J2EE container (e.g. Tomcat).
By default there are two users in a new MapStore instance:
admin, a user with ADMIN role, with passwordadminuser, a user with USER role, with passworduser
You can use a running instance of MapStore in a tomcat as your own development back-end service
by configuring appropriately the devServer proxy in the webpack configuration file.
Note
MapStore uses:
npm for JS dependencies
babel for compatibility with all browsers
webpack as module bundler (and dev server, with proxy)
karma as unit test runner
maven to Java dependencies and to build the final web application
Running build.sh you run basically runs:
npm install # download npm dependencies
npm run fe:build # build JS/HTML/CSS bundled
mvn install #download JAVA dependencies and build the final war
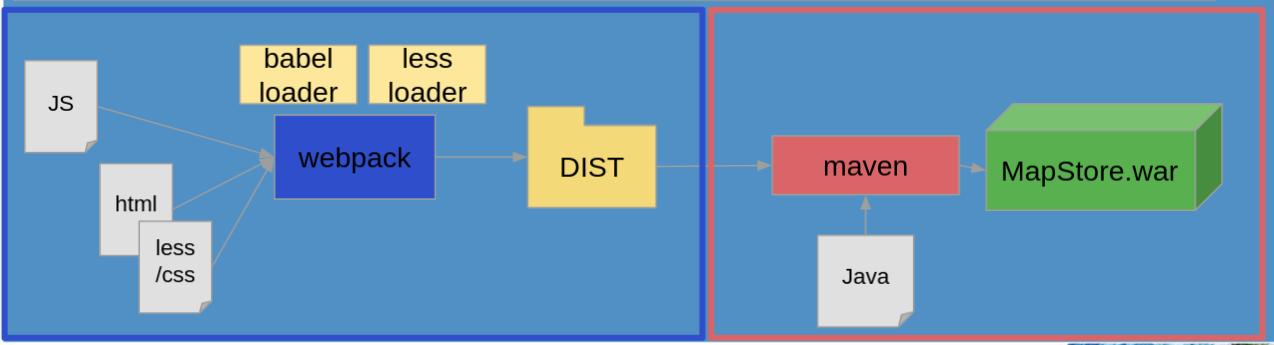
npm run fe:build executes the part in blue, while mvn install the part in red.
The copy of dist directory and *.html files made by maven allow to include the client
in the final war file created in web/target.
Running unit tests
The project will provide you a setup ready for running your unit tests. This setup will run automatically the test contained in the files that ends with -test.js or -test.jsx.
We use to store them in __tests__ folders by convention.
Here the commands to run the unit tests:
Run tests:
npm test
Run test with hot reload:
npm run test:watch
Note
You can change or reduce the number of tests executed by npm run test:watch by editing tests.webpack.js, changing the base path or the regex used for searching the files.
See the main developer documentation here for more details
Running in Dev Mode
MapStore is a single page application, so you can run it in development mode using the webpack dev server. It uses a Java back-end. Both can run using the commands
npm start
This command runs both the back-end on port 8080 and the front-end on port 8081.
You can run the 2 services separately (even in 2 different terminal instances):
# Run back-end on port 8080
npm run be:start
# Run front-end on port 8081
npm run fe:start
Debugging the Backend
mvn eclipse:clean eclipse:eclipse
This creates the projects that can be imported in the Eclipse IDE.
Note
You may not need to develop on MapStore back-end. You can use instead your favorite back-end framework, and integrating authentication using database and/or REST services (GeoServer integration uses this techniques). If you want, you can follow the debug section of developer guide for more information.
Recommended Browser Extensions
Adding redux dev tools extension to your browser and adding debug=true to the query string you can monitor all redux actions and state modification during the execution of MapStore in development.
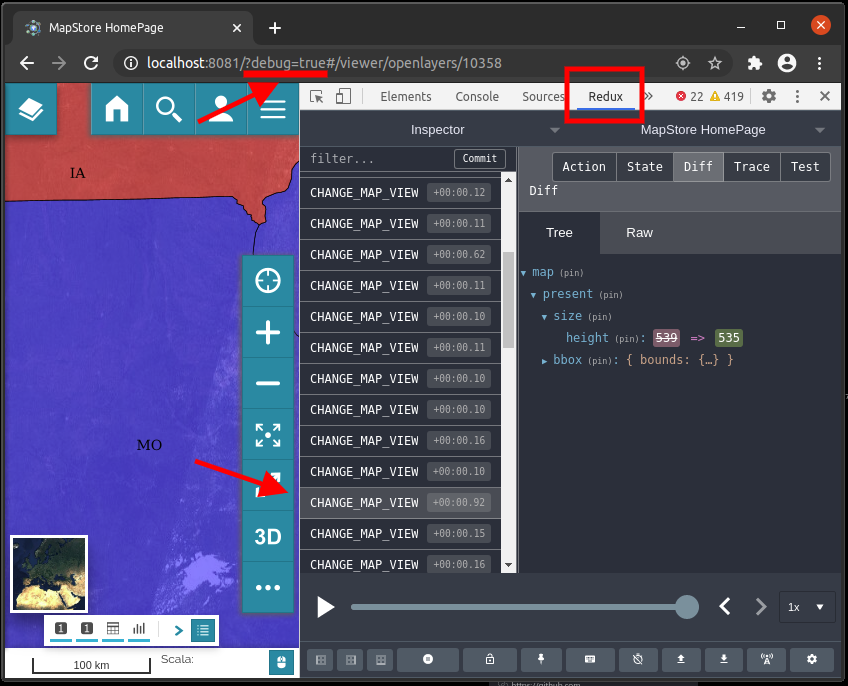
redux-dev-tools
Recommended IDE Extensions
All people in mapstore team has switched to VS Code and we strongly recommend it. Here is a list of needed extensions that will make your life, as programmer, easier
Not necessary, but nice to have
We do not use prettier yet, so it’s up to you to install it in your project